
การใช้ Remote Desktop (RDP) เพื่อเชื่อมต่อและควบคุม Windows Server จากระยะไกลเป็นวิธีที่สะดวกและเป็นที่นิยม แต่ Port เริ่มต้นที่ใช้ในการเชื่อมต่อคือ Port 3389 ซึ่งเป็น Port ที่รู้โดยทั่วกัน และมักถูกใช้โจมตีจากผู้ไม่หวังดี การเปลี่ยน Port เริ่มต้นนี้เป็นหนึ่งในวิธีที่ช่วยเพิ่มความปลอดภัยและลดความเสี่ยงให้กับ Server ของคุณได้อย่างมีประสิทธิภาพ
วิธีการเปลี่ยน Port Remote Desktop
การเปลี่ยน Port Remote Desktop ด้วย PowerShell
1. พิมพ์คำสั่งดังนี้ใน PowerShell
โดยทำการเปลี่ยนค่า $portvalue เป็น Port ตามที่ต้องการ โดยในตัวอย่างนี้จะใช้ Port 3390
$portvalue = 3390

Set-ItemProperty -Path 'HKLM:\SYSTEM\CurrentControlSet\Control\Terminal Server\WinStations\RDP-Tcp' -name "PortNumber" -Value $portvalue

New-NetFirewallRule -DisplayName 'RDPPORTLatest-TCP-In' -Profile 'Public' -Direction Inbound -Action Allow -Protocol TCP -LocalPort $portvalue
New-NetFirewallRule -DisplayName 'RDPPORTLatest-UDP-In' -Profile 'Public' -Direction Inbound -Action Allow -Protocol UDP -LocalPort $portvalue
โดยในคำสั่งข้างต้น จะเป็นการระบุว่าให้ใช้ Port 3390 ในการใช้งาน Remote Desktop
และทำการเพิ่มการตั้งค่า Firewall ให้ Allow การใช้งาน Port 3390 ที่ Protocol TCP และ UDP
การเปลี่ยน Port Remote Desktop ด้วย GUI
1. ทำการเปิด Registry Editor
โดยการพิมพ์คำสั่ง regedit ลงใน Search Box หรือกด Start + R จากนั้นพิมพ์คำสั่ง regedit

2. แก้ไข Registry
ไปที่
HKEY_LOCAL_MACHINE > System > CurrentControlSet > Control > Terminal Server > WinStations > RDP-Tcp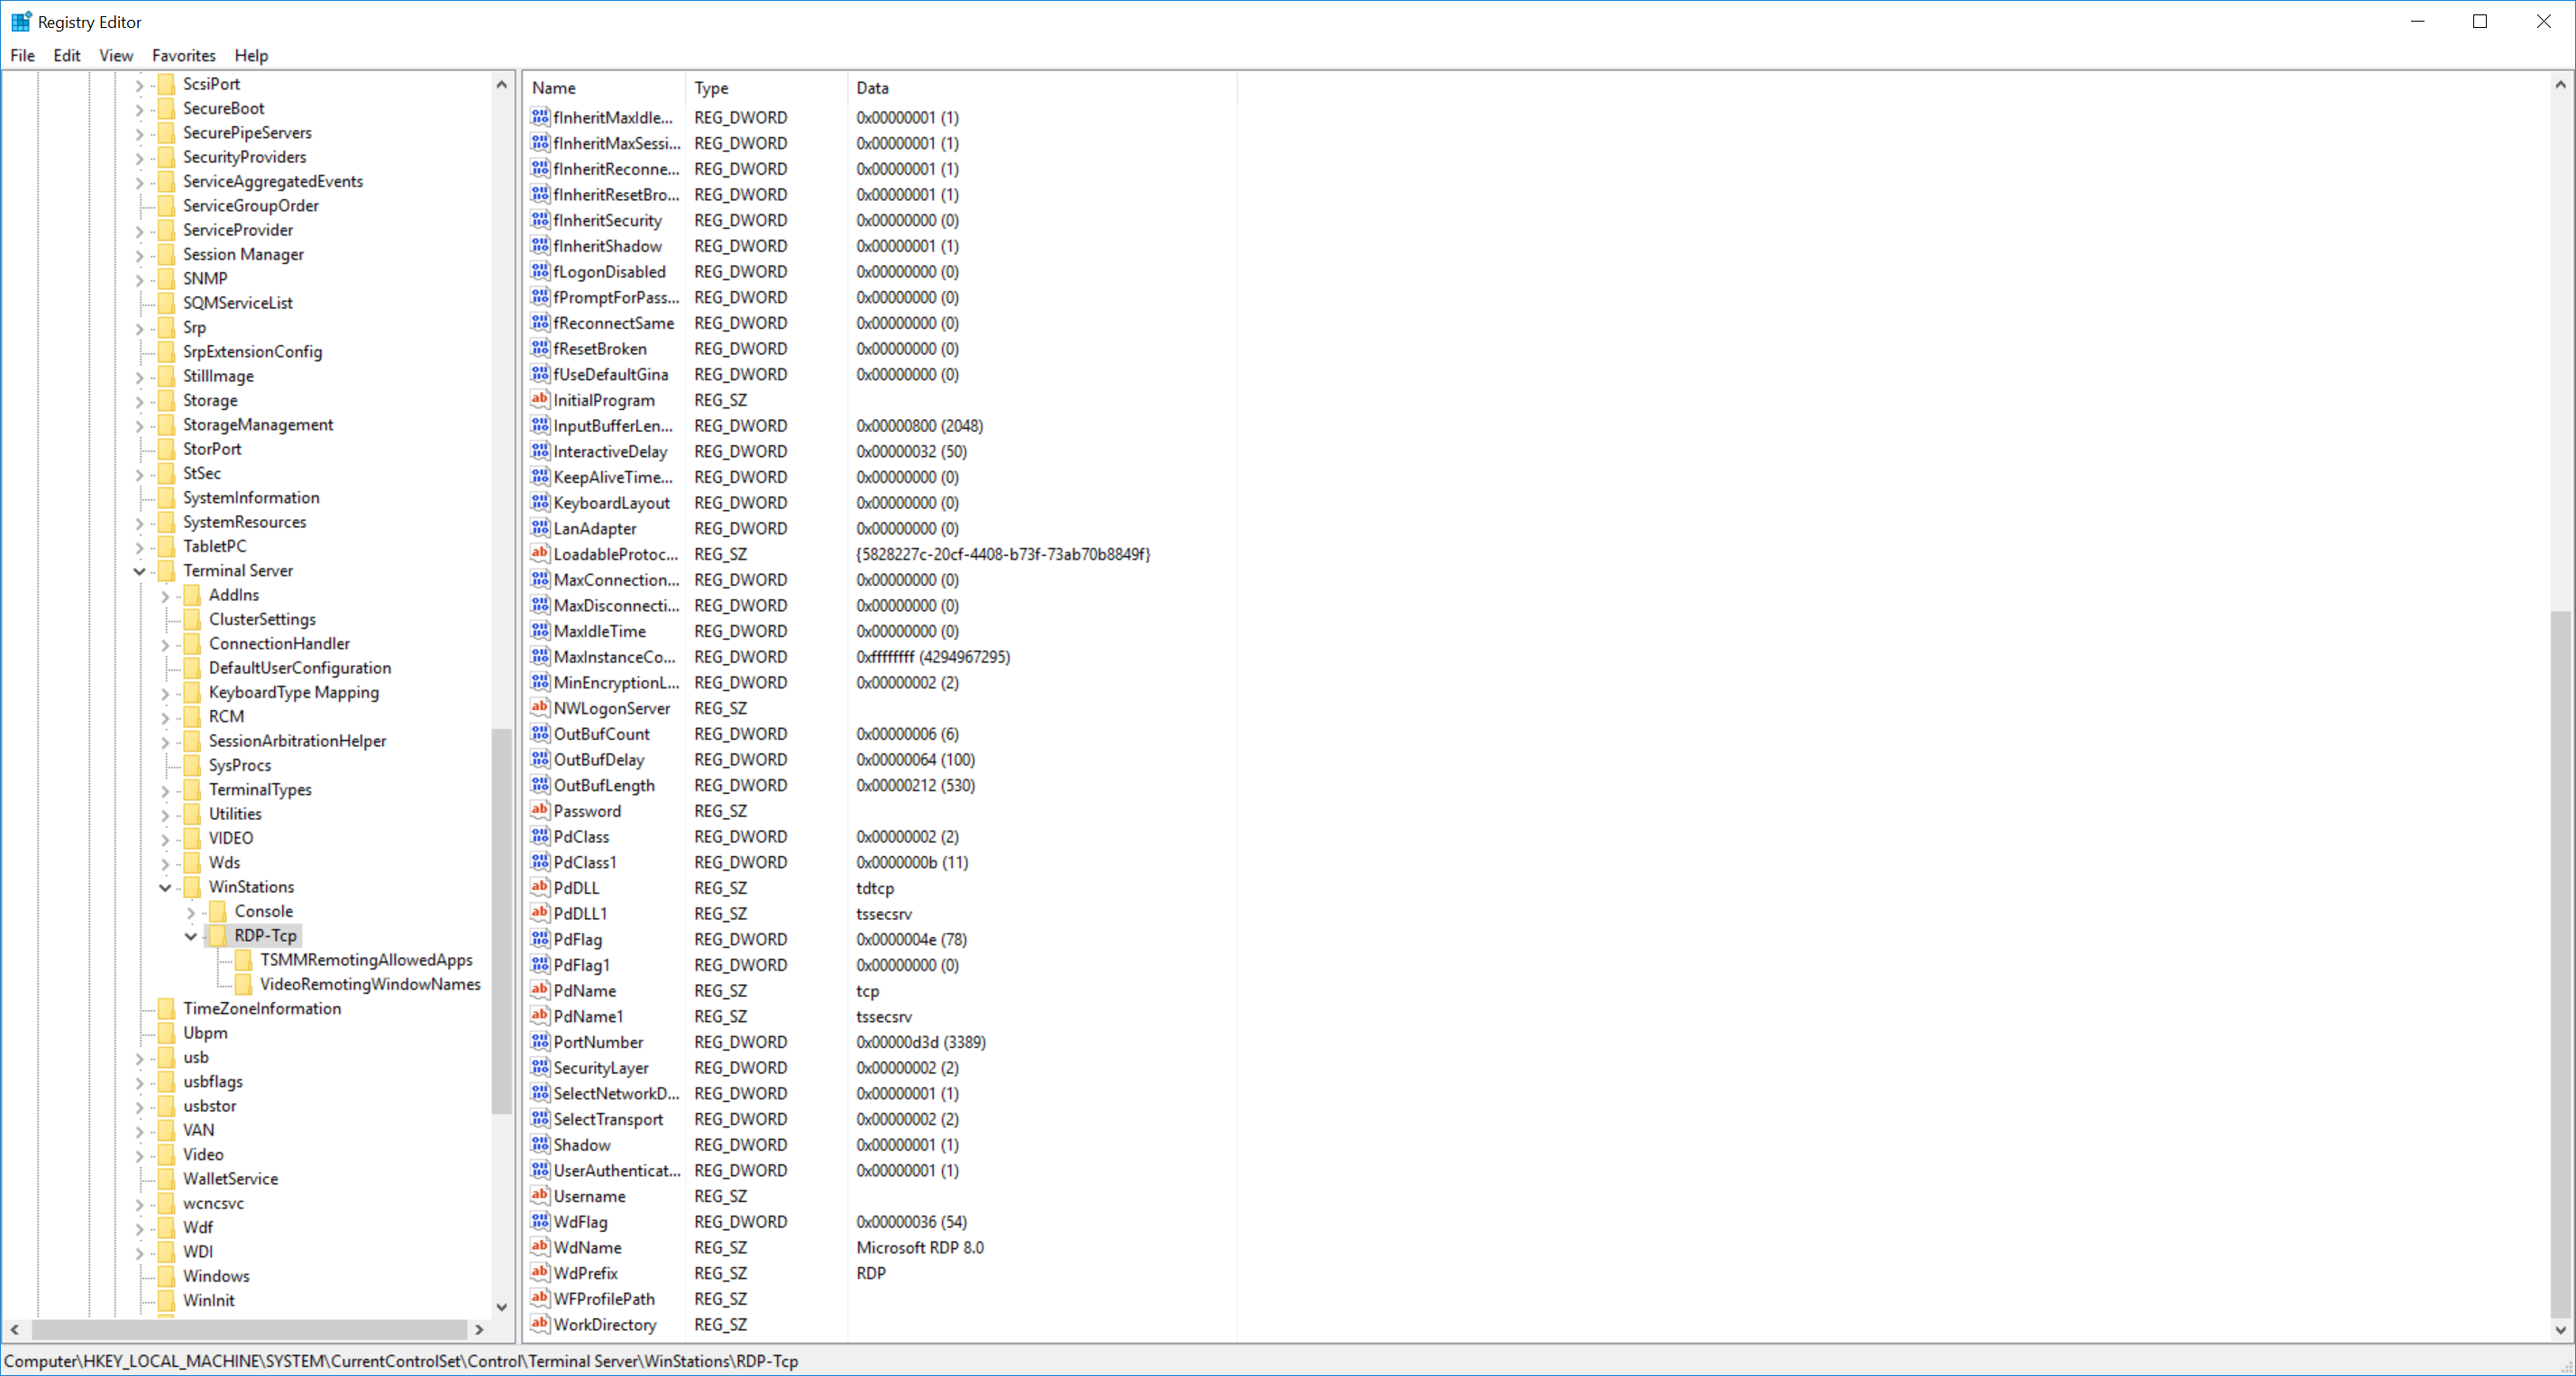
3. แก้ไขไฟล์ PortNumber
คลิกขวาที่ไฟล์ PortNumber และคลิก Modify

จากนั้นคลิก Decimal เปลี่ยนจาก 3389 เป็น Port ที่ต้องการ โดยในตัวอย่างนี้จะใช้ Port 3390
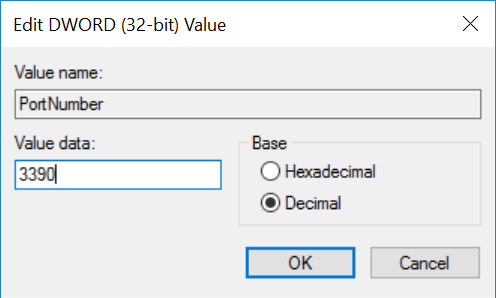
จากนั้นกด OK เป็นอันเสร็จสิ้น
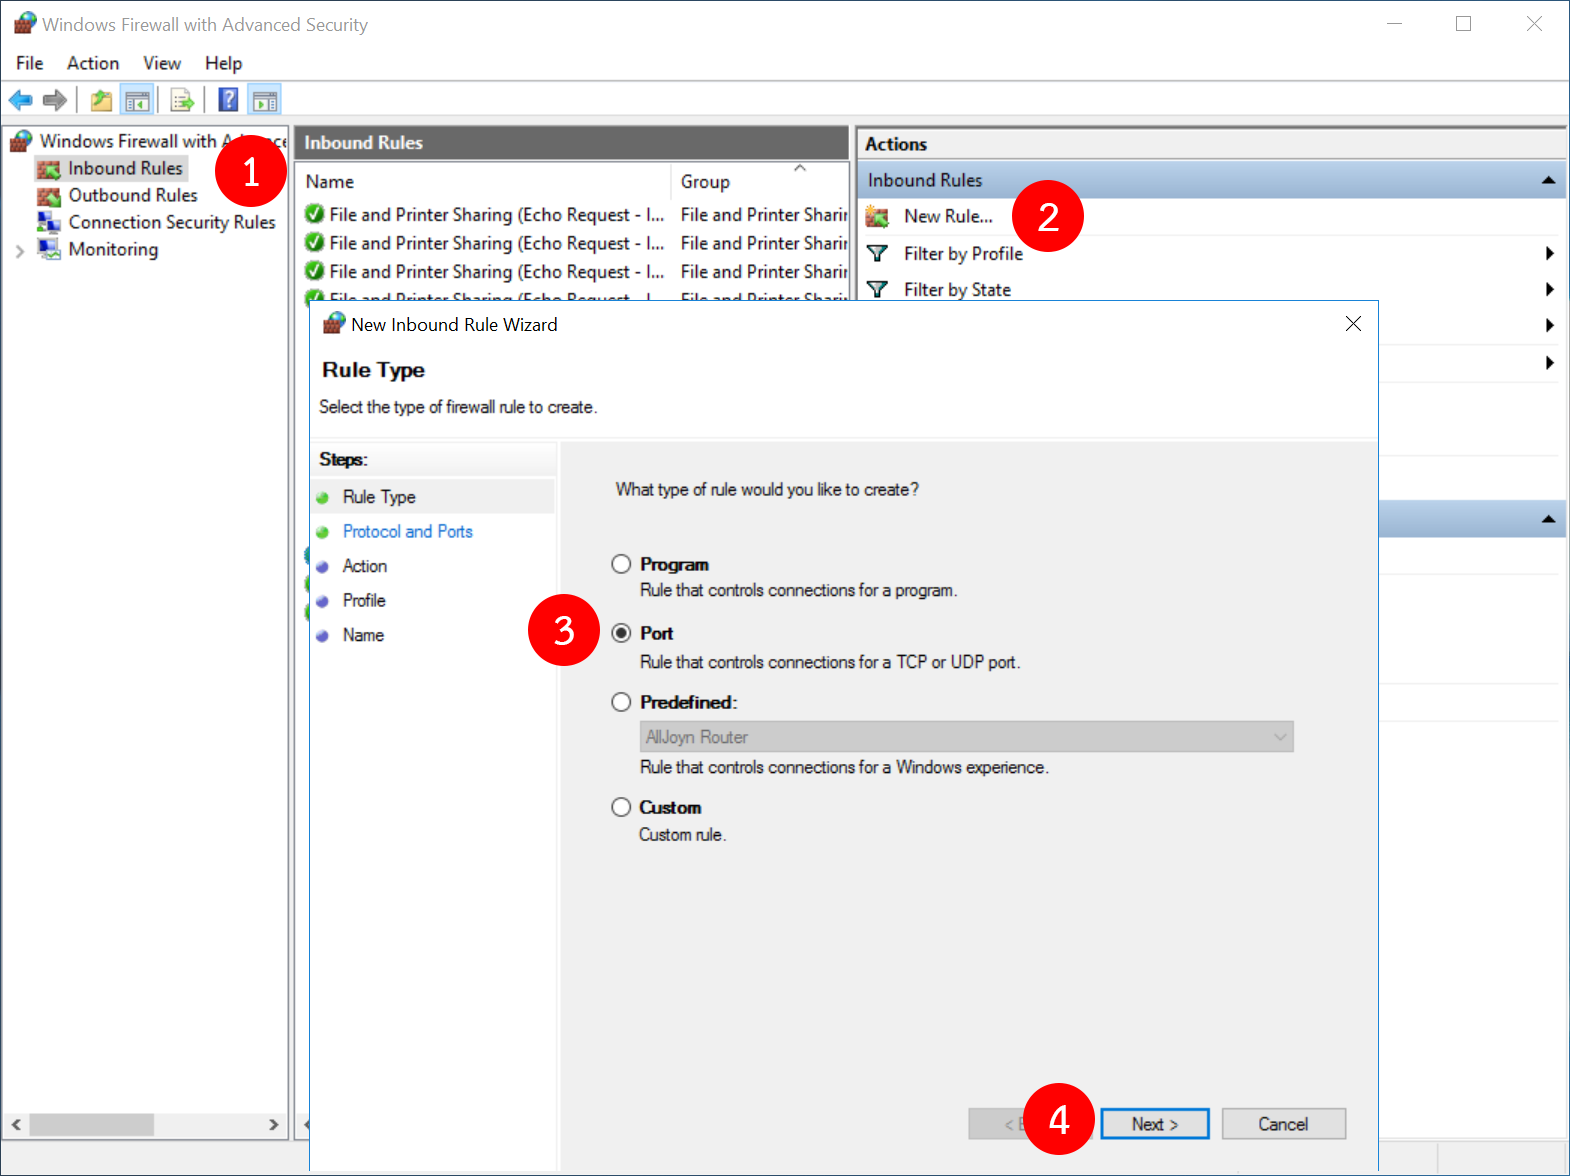
4. ทำการเพิ่ม Firewall Rule
ไปที่
Control Panel > System and Security > Administrative Tools > Windows Firewall with Advance Security
จากนั้นให้ทำการคลิก Inbound Rule และคลิก New Rule… จะปรากฎหน้าต่าง New Inbound Rule Wizard
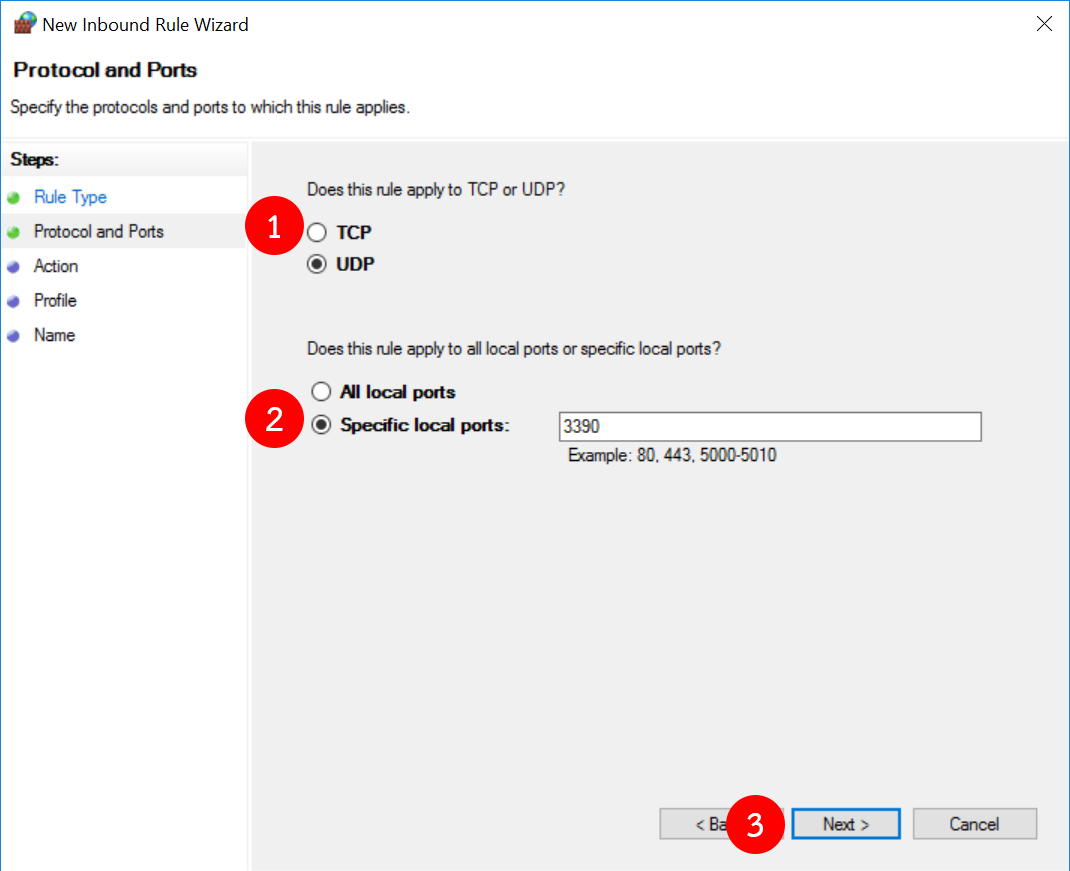
ให้ทำการคลิก Port จากนั้นกด Next
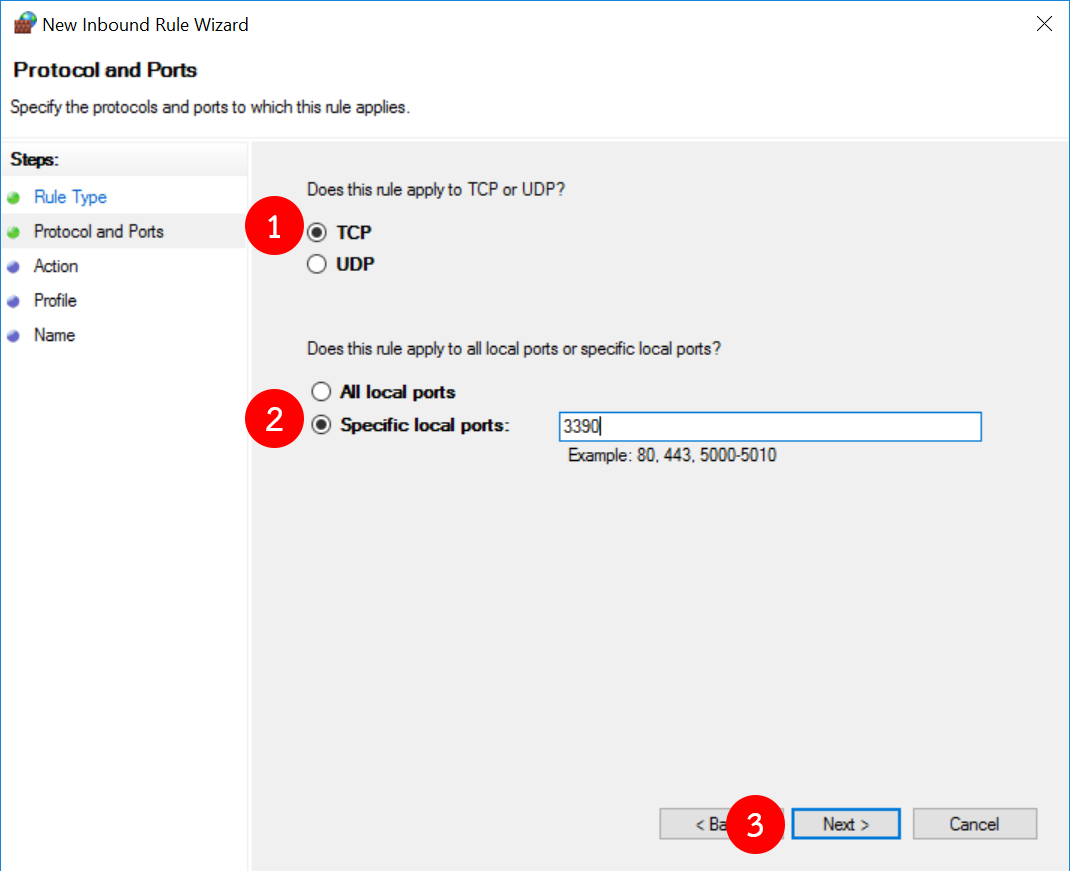
จากนั้นให้เลือก TCP
และที่ Specific local ports: ให้ใส่ 3390
จากนั้นให้เลือก Allow the connection และกด Next
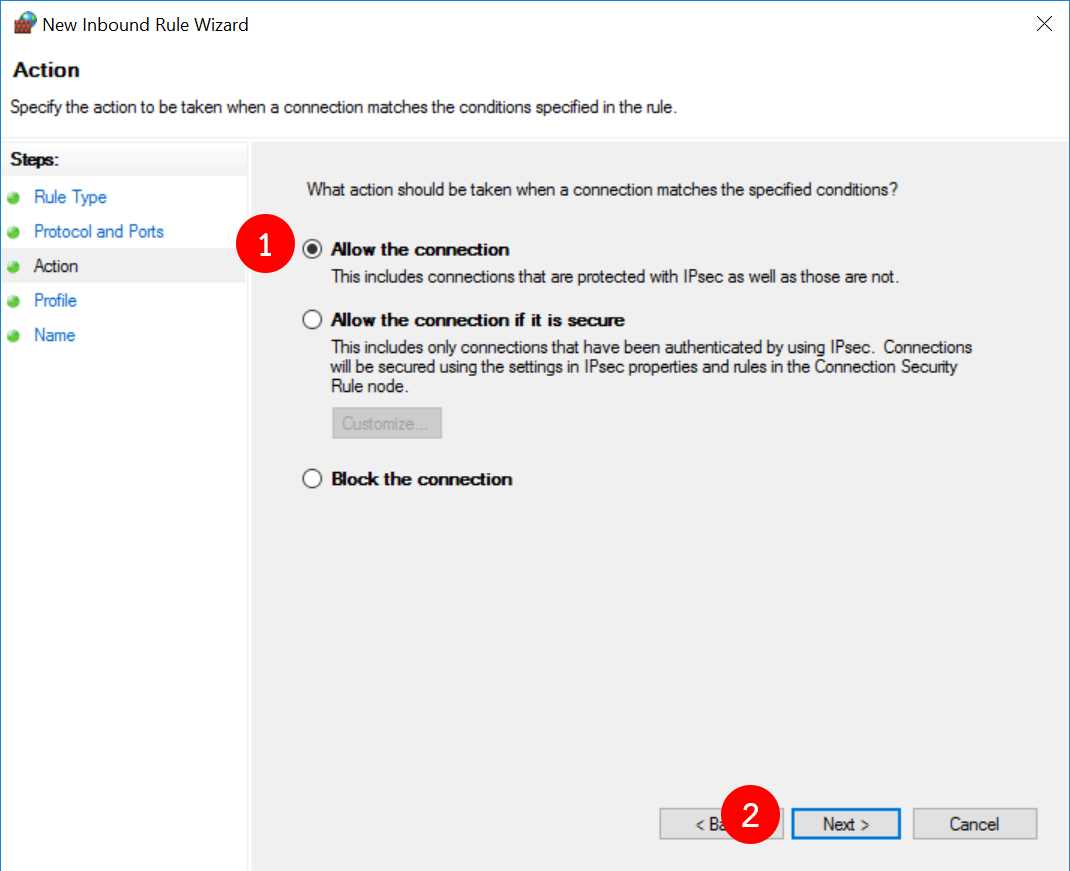
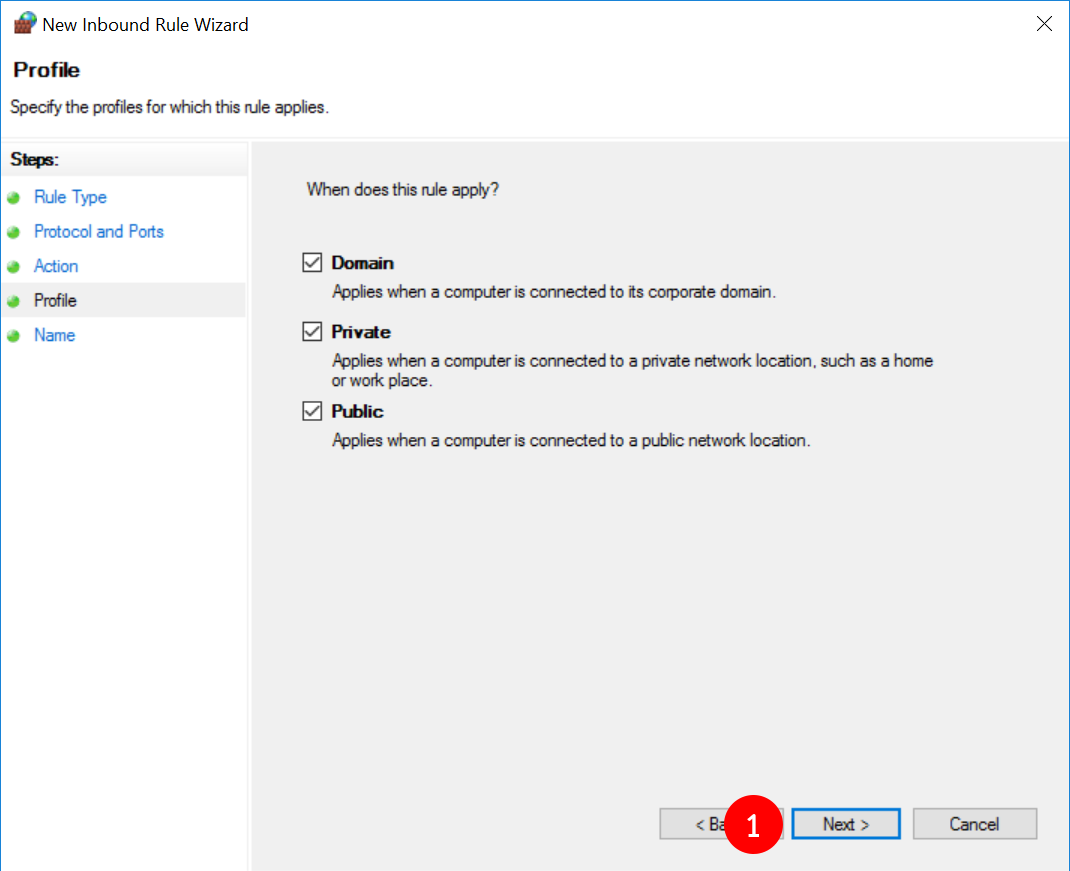
กด Next
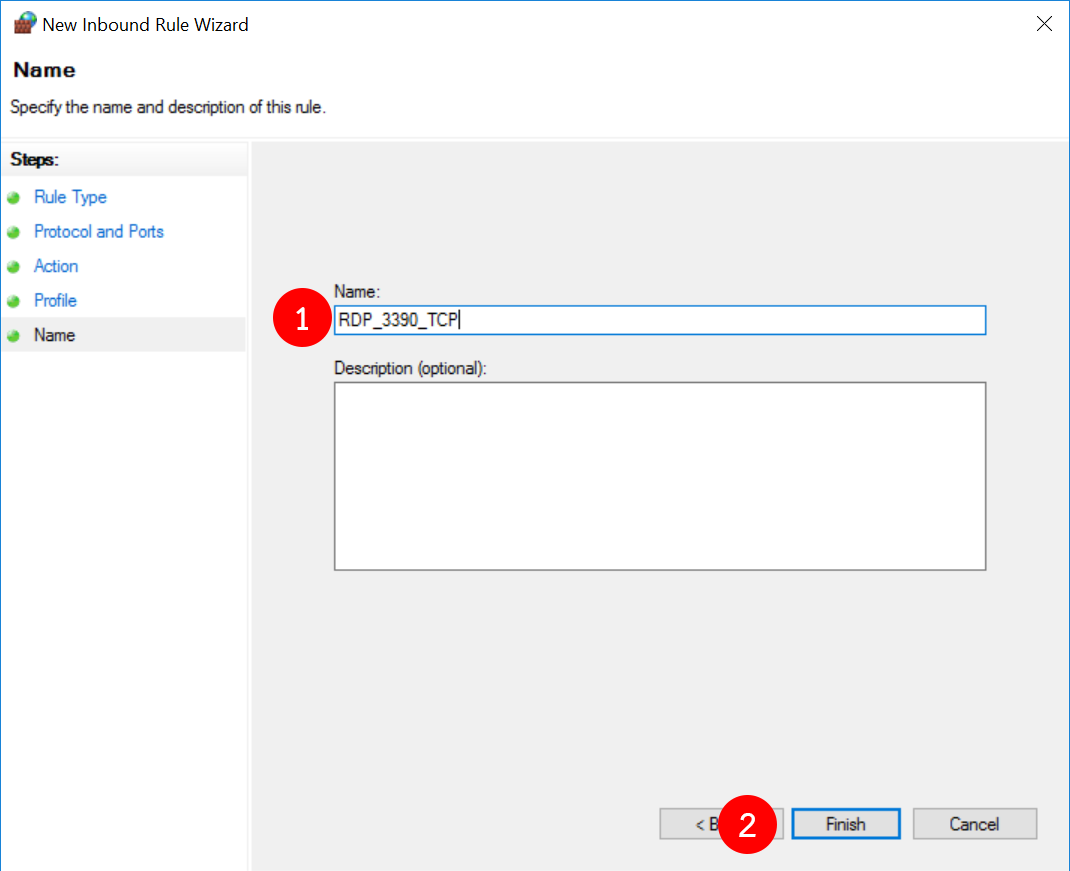
ตั้งชื่อ Rule ตามที่ต้องการ จากนั้นกด Finish
ทำตามขั้นตอนเดิมอีกครั้ง แต่เปลี่ยนจาก TCP เป็น UDP
เมื่อทำตามขั้นตอนเสร็จแล้ว จะเห็นว่ามี Firewall Rule เพิ่มขึ้นมา
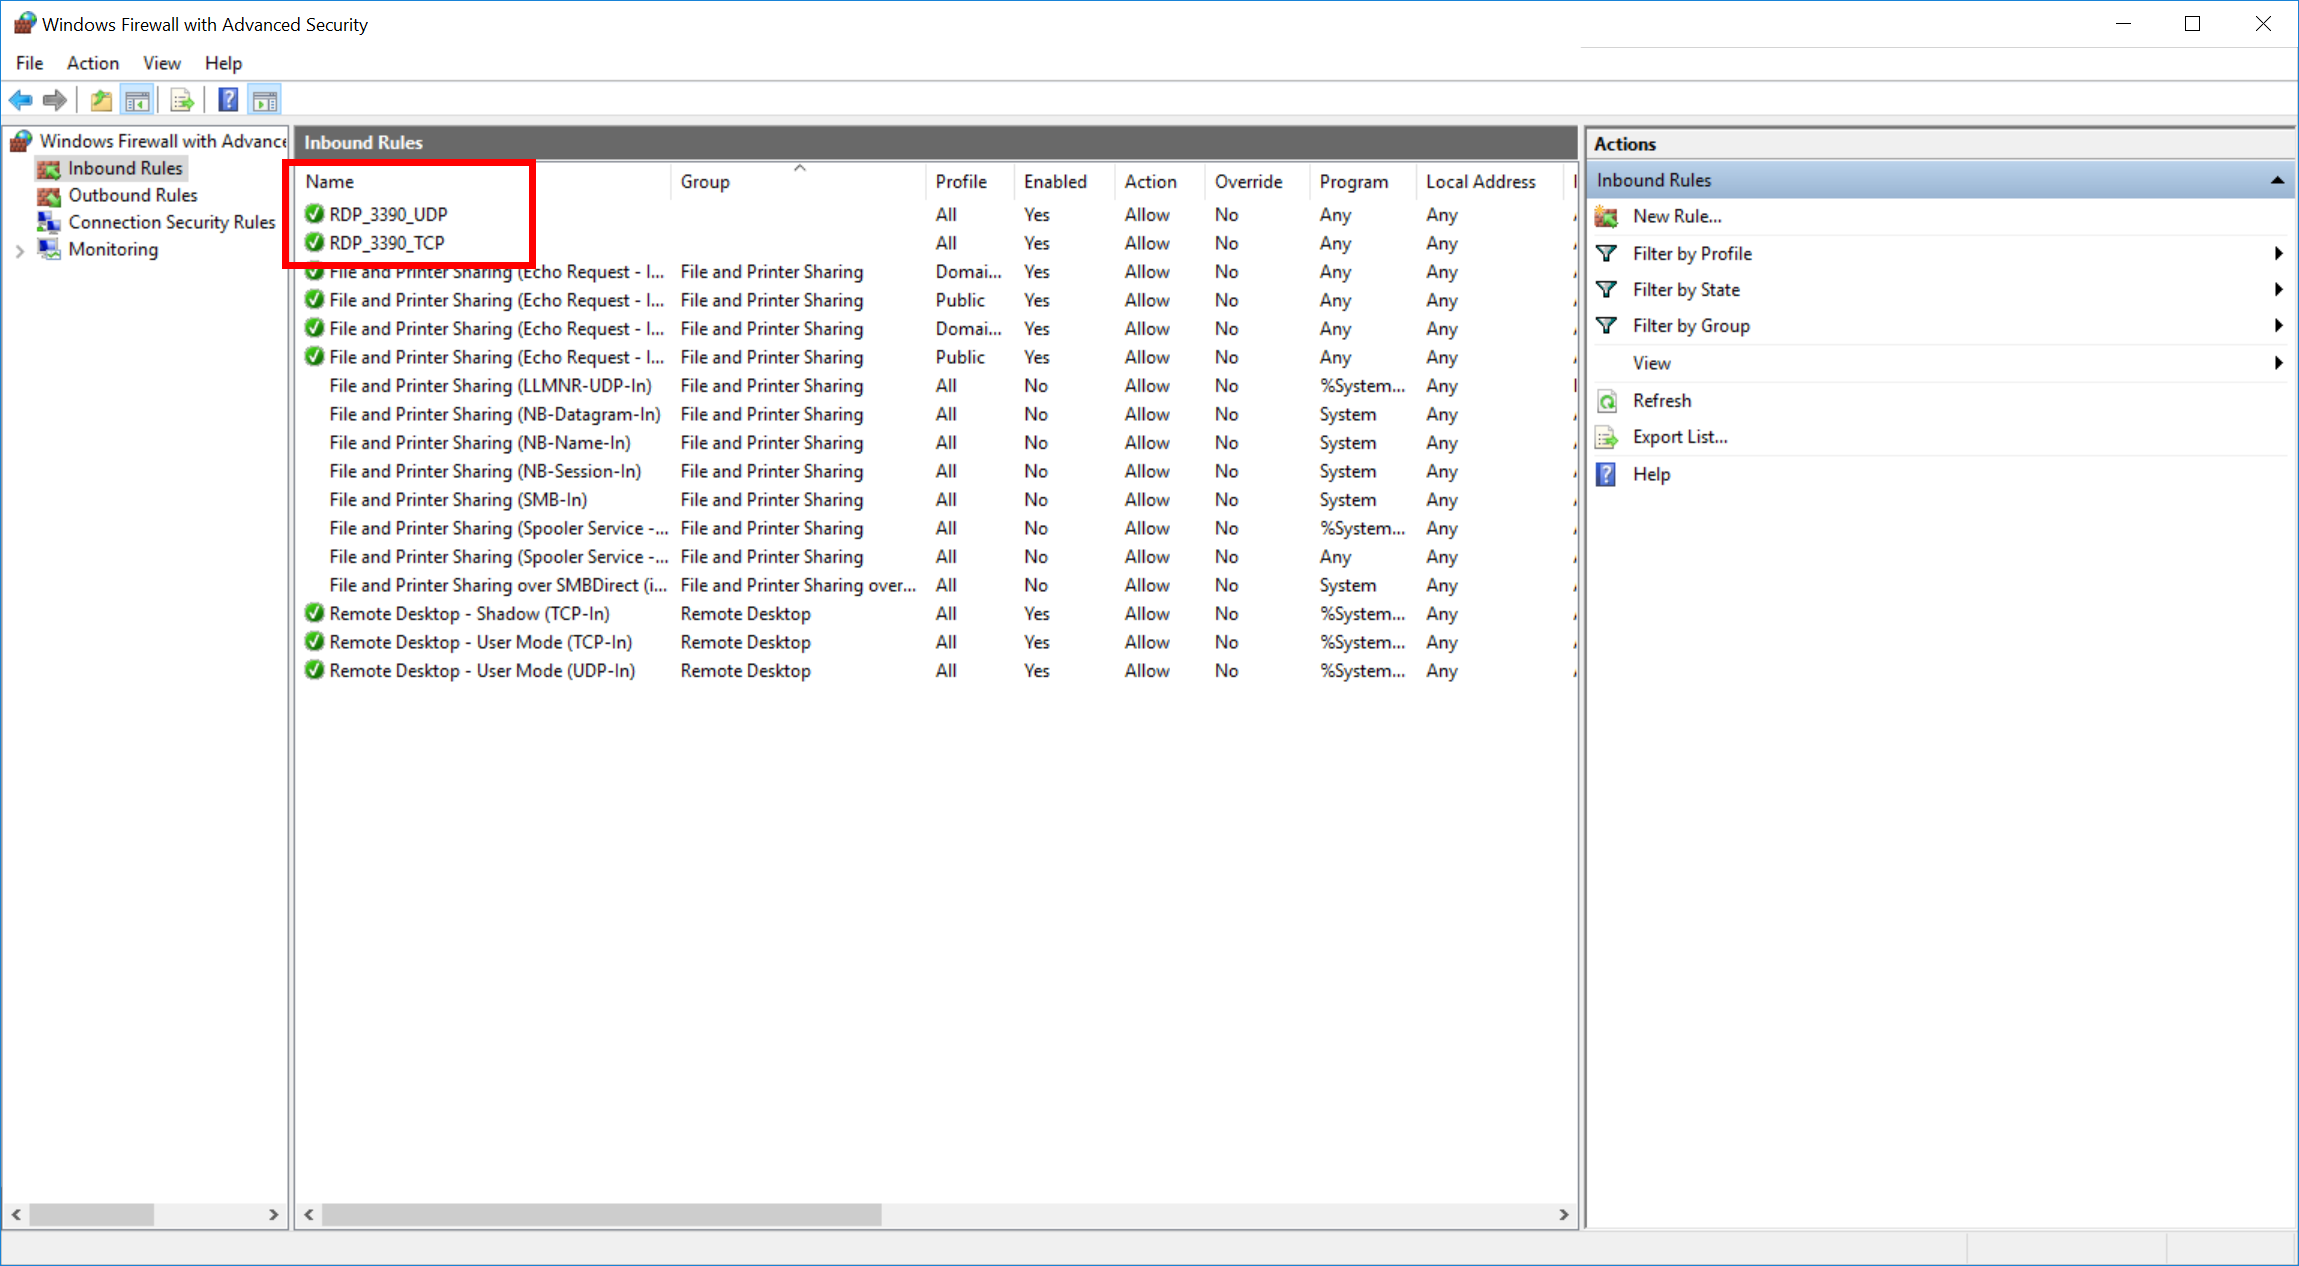
ใช้งาน Remote Desktop ด้วย Port ที่ตั้งค่าไว้
1. ตรวจสอบว่าได้ทำการตั้งค่า Port ใหม่แล้ว
Get-ItemProperty -Path 'HKLM:\SYSTEM\CurrentControlSet\Control\Terminal Server\WinStations\RDP-Tcp' -name "PortNumber"
จะพบผลลัพธ์ดังนี้
PortNumber   : 3390
PSPath       : Microsoft.PowerShell.Core\Registry::HKEY_LOCAL_MACHINE\SYSTEM\CurrentControlSet\Control\Terminal Server\WinStations\RDP-Tcp
PSParentPath : Microsoft.PowerShell.Core\Registry::HKEY_LOCAL_MACHINE\SYSTEM\CurrentControlSet\Control\Terminal Server\WinStations
PSChildName  : RDP-Tcp
PSDrive      : HKLM
PSProvider   : Microsoft.PowerShell.Core\Registry
2. Restart Remote Desktop Service
เมื่อมีการตั้งค่าเสร็จแล้ว ให้ทำการ Restart Remote Desktop Service ด้วย PowerShell โดยใช้คำสั่ง
Restart-Service -Force -Name “TermService”
3. เข้าใช้งาน Remote Desktop
โดยจะต้องมีการเติมเลข Port ที่ทำการตั้งค่าไว้ ในรูปแบบดังนี้
[ip_address]:[port_number]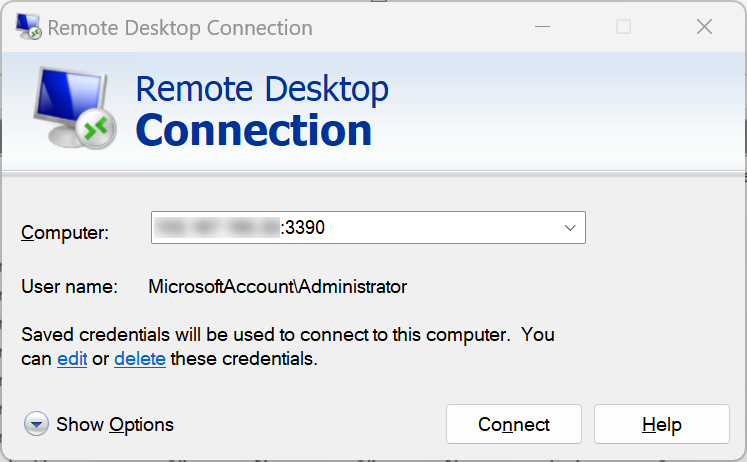
Leave A Comment?